Device Reconnection
If your device/server stops communicating with our Device Management Service, the interruption means we are unable to capture accurate meter reading data, trigger automatic consumables replenishment or provide proactive support services for your device, causing disruption to these services.
We are committed to successfully fulfilling the delivery of the Device Management Service & improving your experience, we ask for your cooperation to ensure your devices remain consistently connected.
The effected RDS version on your server or the device serial number will be referenced in the email you have received.
If your device has stopped communicating with us, please follow the instructions in the 'Device has stopped communicating' section below.
If your server has stopped communicating with us, please follow the instructions in the 'Server has stopped communicating' section below.
If you have any issues, please contact Canon Support
Device has stopped communicating
How to do a communications test on your device
-
- Press the [123] button, which can be found either on the control panel or main screen of the device.
- Select [Monitoring Service]
- Select [Communication Test]
- Select [Start Test]
If “Communication was successful” is displayed, the device is now communicating with the eMaintenance server and no further action is required.
If the communication is unsuccessful, an error code will be displayed, please go to the "Communication Test has resulted in error” section.
If these steps have not resolved the issue please contact us
- Press the [123] button, which can be found either on the control panel or main screen of the device.
-
- On the device screen, select [Check Counter]
- In the Monitoring Service menu, select [Communication Test]
- When it asks if you want to allow information to be sent to the sever, please select [Yes]
If “Communication was successful” is displayed, the device is now communicating with the eMaintenance server and no further action is required.
If the communication is unsuccessful, an error code will be displayed, please go to the “Communications Test has resulted in error” Section.
If these steps have not resolved the issue please contact us
- On the device screen, select [Check Counter]
-
If your device cannot communicate with Canon then the Communication Test will return an error code.
If any changes have been made to your device or network, please restart the device, and complete another communications test.
Your device is busy (error code ends in 0304 or 2000)
Please wait 5 minutes and retry the test. If you get the same error, please restart the device, and try the test again.
Check the date and time on your device
If the date and time are incorrect, the machine will have problems communicating with our Device Management Service.
Ask your IT Department to check the network connection
- Perform a ping command from Command Prompt “ping ‘device IPADDRESS”
- Connect to the Remote User Interface RUI via browser “link”
Advance series : https://oip.manual.canon/USRMA-6097-zz-CS-3800-enGB/contents/devu-mcn_mng-rui-strt.html#319_h1_01
LBP series : https://oip.manual.canon/USRMA-0699-zz-SS-enGB/contents/SS352_remoteui_122startingremoteui.html#10010000If the device is reachable
- Check the settings on the device via RUI (Gateway - DNS - Proxy and Authentication if used)
- Connect to RUI via browser as Administrator
- Select Setting/Registration
- Select Network Setting
- Select Network IPv4 Settings
- Check the Gateway and the DNS settings if are correct
- Select Proxy Settings (if used)
- Check if “Use Proxy” is set or is “ON”
- Check If the Proxy Addresses and the Port are correct
- Check If the Proxy Authentication (if used) is correct
- If you have changed any settings, please restart the device
If your firewall setting have changed then set on the firewall the permission to reach the URL: b01.ugwdevice.net
If the Device is Unreachable
- If the device is switched off, then turn it back on.
- If the Network cable is disconnected, then reconnect it to the device.
- If the device is switch on, verify that the IP-Subnet-Gateway addresses are correct.
-
Perform a Communication Test to verify that the normal connectivity status of the device is resumed.
If these steps have not resolved the issue please contact us


Server has stopped communicating
-
- Log in to the CDCA on your browser (Chrome – Edge – Firefox) as an administrator
https://IPadresses Server or FQDNofCDCAserver/account/signin?ReturnUrl=%2F
-
- In the screen shot below you can see an example the devices that are connected with CDCA.
- The status light is Green = Power On & communication is OK
- The status light is Yellow = No Response, please check the connectivity (the network might not be available/the device switched Off/IP address has been changed changed/device replaced)
- The status light is Gray = Power Off
Please check the below scenarios to help reconnect your devices.
Scenario 1: the device IP addresses has been changed.
- Select [Devices].
- Select [Device Communication Settings].
- Select [Authentication Information].
- Check if the Authentication Method is correct.
- Select [Devices] – [Discover Devices]
- Add the IP range or the single IP address to search and click [Discover]
- The IP address/es will be replaced correctly with the new one(s) on the device list.
Scenario 2: The device/s was/were replaced with a new one with the same IP address(es).
- Select [Manage Devices]
- Select the devices replaced and then click [Remove from Management].
- Select the menu [Devices Removed from Management] – select the device removed and click [Delete].
- Select [Devices] – [Discover Devices]
- Add the IP range or the single IP address to search and click [Discover].
- The new device/s will be replaced correctly with the new one(s) on the device list.
If these steps have not resolved the issue please contact us
- Log in to the CDCA on your browser (Chrome – Edge – Firefox) as an administrator


CDCA fails to communicate with UGW (for server administrator)
-
- Log in to the CDCA on your browser (Chrome – Edge – Firefox) as an administrator
https:// IPAddresseServer or FQDN of CDCAserver/account/signin?ReturnUrl=%2F
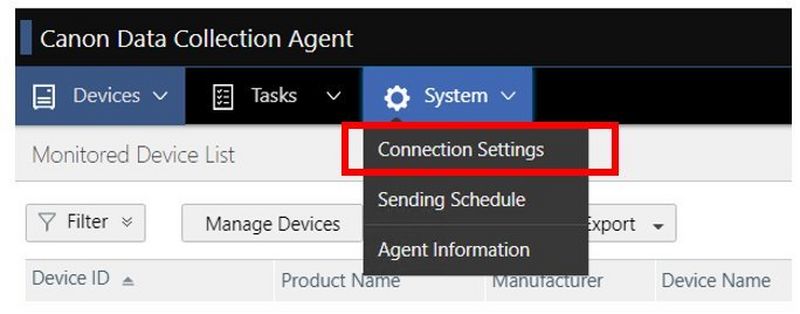
- Select [System] - [Connection Settings]
Perform the Communication Test
If you do not have a proxy server:
If you have a proxy server:
- If the communication test was successful then no further action is needed
- If the communication test failed, please check in your network server if the DNS - Gateway configuration is correct or if the firewall configuration is unable to reach the URL: b01.ugwdevice.net
Also check the proxy settings (if used) to make sure the proxy configuration, port number and authentication settings are correct.
Perform the Communication Test again and check the result
If these steps have not resolved the issue please contact us
- Log in to the CDCA on your browser (Chrome – Edge – Firefox) as an administrator
-
- Log in to the CDCA on your browser (Chrome – Edge – Firefox) as an administrator
https://FQDNofCDCAserver/account/signin?ReturnUrl=%2F
- Select [System] - [Connection Settings]
- Click the [Send Test email] button
- If the communication test was successful then no action is needed
- If the communication test failed, please check the SMTP configuration if is correct
Perform the Communication Test again and check the result
If these steps have not resolved the issue please contact us
- Log in to the CDCA on your browser (Chrome – Edge – Firefox) as an administrator


IWMC-RDS fails to communicate with devices (for server and devices administrator)
-
- Connect to the Console iWMC as an administrator on your browser.
- Select [e-Maintenance (HTTP or SMTP)]
- Select [Device Management (Service Representative Only)]
- Select [Monitored Device Management (Service Representative Only)]
- Check the device status.
- Select the devices with Communication Error displayed.
- Check if the IP addresses are correct and if the devices are available (turned on)
- If the IP addresses are incorrect select the device/s and [Edit], if the device is turned off, switch it back on.
- Replace the IP addresses with the new one and press [Update] and perform the [Communication Test] with the device(s)
If these steps have not resolved the issue please follow the relevant step below
- Connect to the Console iWMC as an administrator on your browser.
-
- Select [Device] and [Discovery] on the top of the menu.
- Select [Discovery] – [Quick Discovery]
- Select [SNMPv1 - Specified IP address discovery]
- Enter the IP address and click [Discover]
(check in the device list to make sure the device is available)
- Click [Create Task to Discover Devices] - select the protocol and then click [Next]
- Specify the IP address, the IP range or Add from File (.txt)
- Click [Next]
- Create the Task Name and Select [Execute now]
-
- Click [Register]
-
(check in the device list if the device(s) is/are available)
If these steps have not resolved the issue please contact us
- Select [Device] and [Discovery] on the top of the menu.
-
- Select [eMaintenance (HTTP or SMTP)]
- Click [Add Devices (Service Representative Only)]
- Register the new device with IP address and serial number.
- Click [Add]
If these steps have not resolved the issue please contact us
-
- Select [eMaintenance (HTTP or SMTP)]
- Click [Add Devices (Service Representative Only)]
- Select [Add from Device List]
- Select the device(s) discovered (from the device list)
- Select [Add to Target Devices] and click [Add]
- Select the device(s) again and click [Add] and check the [Status]
- Refresh the page and check if the status is [Registered]
- Perform the [Communication Test] with the device(s) and [Refresh]
- Check if the [Communication Test] is completed
If the device(s) do not register or the Communication Test is not completed, please check the network status of the devices
If these steps have not resolved the issue please contact us
-
- Select [e-Maintenance (Http or SMTP)]
- Select [Device Management (Service Representative Only)]
- Select [Monitored Device Management (Service representative Only)]
- Select the device(s) to delete.
- Click [Delete]
- Select [Device] at the top of the menu.
- Select [List] – [Device List]
- Select the device(s) to delete and click [Delete]
If these steps have not resolved the issue please contact us


IWMC-RDS fails to communicate with UGW (for server administrator)
-
- Connect with the browser on the iWMC as an administrator
http://FQDNofiWMCserver/iWMC/Login/BasicLogin.aspx?ReturnUrl=%2fiwmc%2fDefault.aspx
- Select [e-Maintenance (HTTP)]
- Select [Configuration (Service Representative Only)]
- Select [RDS Settings (Service Representative Only)]
- Perform the [Communication Test]
Without Proxy
With Proxy
- If the Test Communication was successful, no further action is needed.
- Select and click [Update Schedule Information]
- If the Communication Test failed, please check in your network server if the DNS - Gateway configuration is correct or if the firewall configuration is able to reach the URL: b01.ugwdevice.net
Proxy settings (if used): check if the proxy configuration, the port number and authentication settings are correct.
Perform the Communication Test again and check the result.
If these steps have not resolved the issue please contact us
- Connect with the browser on the iWMC as an administrator
-
- Connect with the browser on the iWMC as an administrator
http://FQDNof iWMCserver/iWMC/Login/BasicLogin.aspx?ReturnUrl=%2fiwmc%2fDefault.aspx
- Select [e-Maintenance (SMTP)]
- Select [Configuration (Service Representative Only)]
- Select [Communication Settings (Service Representative Only)]
- Perform the [Communication Test]
- If the Communication Test was successful, no further action is needed.
- If the Communication Test failed, please check the SMTP configuration on [Common Settings] – [Communications Settings] and [Update] (see below).
You can also perform a test e-mail in the same menu
- Perform the Communication Test and check the result (see the step 2)
If these steps have not resolved the issue please contact us
- Connect with the browser on the iWMC as an administrator


You might also need...
-
Contact Us
Contact us for telephone or e-mail support
-
Serial Number
Find the serial number for your product
-
Recycling
Learn more about Canon's Cartridge Recycling Programme