Saving Images to a Computer using Windows (Windows 10)
FAQ ID: 8202741100
Release date: 19 October 2018
Solution
You can connect the camera to a computer via a USB cable, and save images to a computer running Windows OS without installing any additional software applications. The procedures for connecting the camera to the computer running Windows OS with a USB cable (camera end: Mini-B), and saving images to the computer are explained below.
IMPORTANT
- Depending on the camera model, a USB cable may not be included with the camera.
- If you do not own a USB cable, please purchase one separately.
REFERENCE
The following two types of USB cables are available for compact digital cameras:
*For more information about the type of USB cable that can be used with your camera, please refer to the camera’s instruction manual.
- Camera end: Mini-B (IFC-400PCU)
- Camera end: Micro-B (IFC-600PCU)
Connect the Camera to the Computer
1. Connect the <DIGITAL> terminal of the camera to the computer's USB port using a USB cable (camera end: Mini-B).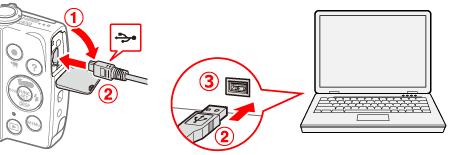
 <DIGITAL> terminal (Camera)
 USB cable
 USB port (Computer)
IMPORTANT
Example procedures are shown on the PowerShot A2600/PowerShot A2500. The position and shape of the operation buttons, screens displayed, and setting items may differ according to the model you use.
2. Press the power button to turn the camera on.

NOTE
- If an application for saving images, such as CameraWindow, starts, please close it.
- Depending on the camera model, once the connection between camera and computer is set, the camera will turn on automatically.
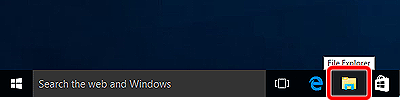
3. Click [File Explorer] on the taskbar appearing on the bottom of the screen.
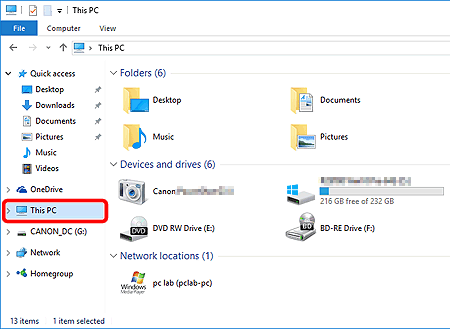
4. When the following screen appears, select [This PC] from the menu items on the left side.
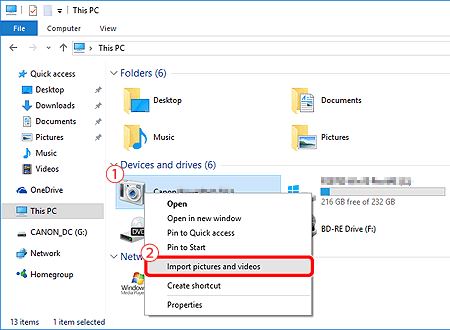
5. Select the camera connected to the PC (), and then right-click on the icon. Next, select [Import pictures and videos] () from the screen displayed.
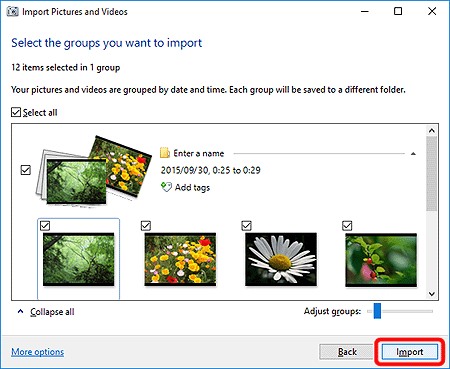
6. Click [Next] when the [Import Pictures and Videos] screen is displayed.

7. Click [Import] to begin image transfer.
NOTE
- [Select All] is set by default.
- To select images to import individually, remove the check from [Select All], and append desired images with a [
 ].
].
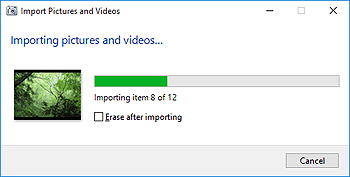
8. Image import (transfer) begins.
9. When image transfer is complete, a screen similar to the following one appears.
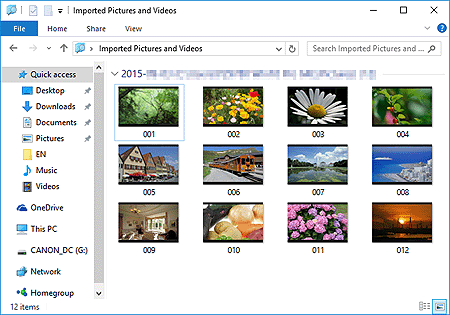
This completes the procedures for importing images.
Changing the Automatic Start-up Settings for Software Applications.
To prevent software applications from starting automatically, follow the procedures below to change the [AutoPlay] settings.
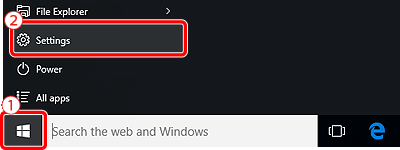
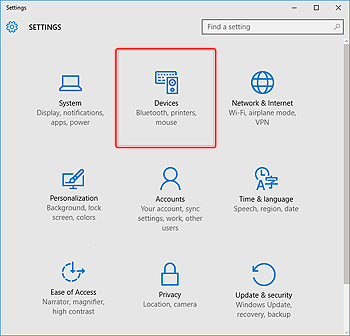
1. Click the [Start] button appearing at the bottom left of the screen (), and then choose [Settings] ().
2. Choose [Devices] from the screen displayed.
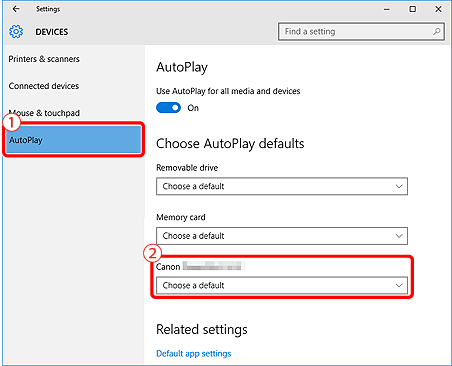
3. Select [AutoPlay] () from the options appearing on the left of the screen to display the AutoPlay setting screen, select the camera () connected to the computer and right-click the icon.
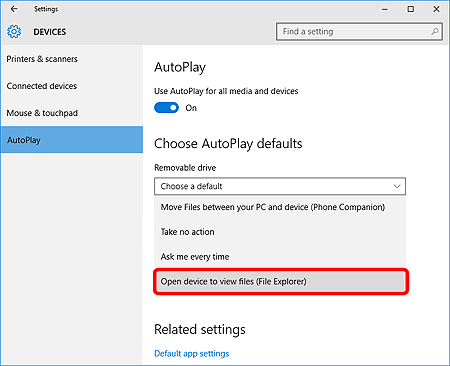
4. Make the settings.
- Choose [Open device to view files (File Explorer)].
This completes the procedure for changing the AutoPlay settings.
Applicable Models
- DIGITAL IXUS 870 IS
- Digital IXUS 100 IS
- Digital IXUS 110 IS
- Digital IXUS 120 IS
- Digital IXUS 200 IS
- Digital IXUS 30
- Digital IXUS 40
- Digital IXUS 400
- Digital IXUS 430
- Digital IXUS 50
- Digital IXUS 500
- Digital IXUS 55
- Digital IXUS 60
- Digital IXUS 65
- Digital IXUS 70
- Digital IXUS 700
- Digital IXUS 75
- Digital IXUS 750
- Digital IXUS 80 IS
- Digital IXUS 800 IS
- Digital IXUS 82 IS
- Digital IXUS 85 IS
- Digital IXUS 850 IS
- Digital IXUS 860 IS
- Digital IXUS 90 IS
- Digital IXUS 900 Ti
- Digital IXUS 95 IS
- Digital IXUS 950 IS
- Digital IXUS 960 IS
- Digital IXUS 970 IS
- Digital IXUS 980 IS
- Digital IXUS 990 IS
- Digital IXUS II
- Digital IXUS IIs
- Digital IXUS Wireless
- Digital IXUS i
- Digital IXUS i zoom
- Digital IXUS i5
- Digital IXUS i7 zoom
- IXUS 1000 HS
- IXUS 105
- IXUS 1100 HS
- IXUS 115 HS
- IXUS 125 HS
- IXUS 130
- IXUS 132
- IXUS 133
- IXUS 135
- IXUS 140
- IXUS 145
- IXUS 150
- IXUS 155
- IXUS 160
- IXUS 170
- IXUS 175
- IXUS 177
- IXUS 180
- IXUS 182
- IXUS 185
- IXUS 190
- IXUS 210
- IXUS 220 HS
- IXUS 230 HS
- IXUS 240 HS
- IXUS 255 HS
- IXUS 265 HS
- IXUS 275 HS
- IXUS 285 HS
- IXUS 300 HS
- IXUS 310 HS
- IXUS 500 HS
- IXUS 510 HS
- PowerShot A1000 IS
- PowerShot A1100 IS
- PowerShot A1200
- PowerShot A1300
- PowerShot A1400
- PowerShot A2000 IS
- PowerShot A2200
- PowerShot A2300
- PowerShot A2400 IS
- PowerShot A2500
- PowerShot A2550
- PowerShot A2600
- PowerShot A300
- PowerShot A310
- PowerShot A3100 IS
- PowerShot A3200 IS
- PowerShot A3300 IS
- PowerShot A3400 IS
- PowerShot A3500 IS
- PowerShot A400
- PowerShot A4000 IS
- PowerShot A430
- PowerShot A460
- PowerShot A470
- PowerShot A480
- PowerShot A495
- PowerShot A510
- PowerShot A520
- PowerShot A530
- PowerShot A540
- PowerShot A550
- PowerShot A560
- PowerShot A570 IS
- PowerShot A580
- PowerShot A590 IS
- PowerShot A60
- PowerShot A610
- PowerShot A620
- PowerShot A630
- PowerShot A640
- PowerShot A650 IS
- PowerShot A70
- PowerShot A700
- PowerShot A710 IS
- PowerShot A720 IS
- PowerShot A75
- PowerShot A80
- PowerShot A810
- PowerShot A85
- PowerShot A95
- PowerShot D10
- PowerShot D20
- PowerShot D30
- PowerShot E1
- PowerShot G1 X
- PowerShot G1 X Mark II
- PowerShot G1 X Mark III
- PowerShot G10
- PowerShot G11
- PowerShot G12
- PowerShot G15
- PowerShot G16
- PowerShot G3 X
- PowerShot G5
- PowerShot G5 X
- PowerShot G6
- PowerShot G7
- PowerShot G7 X
- PowerShot G7 X Mark II
- PowerShot G9
- PowerShot G9 X
- PowerShot G9 X Mark II
- PowerShot N
- PowerShot N100
- PowerShot N2
- PowerShot Pro1
- PowerShot S1 IS
- PowerShot S100
- PowerShot S110
- PowerShot S120
- PowerShot S2 IS
- PowerShot S200
- PowerShot S3 IS
- PowerShot S5 IS
- PowerShot S50
- PowerShot S60
- PowerShot S70
- PowerShot S80
- PowerShot S90
- PowerShot S95
- PowerShot SX1 IS
- PowerShot SX10 IS
- PowerShot SX100 IS
- PowerShot SX110 IS
- PowerShot SX120 IS
- PowerShot SX130 IS
- PowerShot SX150 IS
- PowerShot SX160 IS
- PowerShot SX170 IS
- PowerShot SX20 IS
- PowerShot SX200 IS
- PowerShot SX210 IS
- PowerShot SX230 HS
- PowerShot SX240 HS
- PowerShot SX260 HS
- PowerShot SX270 HS
- PowerShot SX280 HS
- PowerShot SX30 IS
- PowerShot SX40 HS
- PowerShot SX400 IS
- PowerShot SX410 IS
- PowerShot SX420 IS
- PowerShot SX430 IS
- PowerShot SX432 IS
- PowerShot SX50 HS
- PowerShot SX500 IS
- PowerShot SX510 HS
- PowerShot SX520 HS
- PowerShot SX530 HS
- PowerShot SX60 HS
- PowerShot SX600 HS
- PowerShot SX610 HS
- PowerShot SX620 HS
- PowerShot SX70 HS
- PowerShot SX700 HS
- PowerShot SX710 HS
- PowerShot SX720 HS
- PowerShot SX730 HS
- PowerShot SX740 HS
- PowerShot TX1